Retail Lighting Design Education
Lesson 12: Retail Lighting Design Hands-on Tutorials
This is a 6-hour tutorial on how to do a retail shops lighting design. The series of tutorial comprise of both theory and hands-on. Videos, PDF, and sample files are available for download.
Scroll down below to access the video tutorials.
Do you want to learn how to do the lighting design for Lacoste shop?
Enroll now in our 8-hour video tutorial for 27 USD only!
Click enroll button to start.
15 minutes lecture
Topics
-
How to clean and understand the CAD file
-
How to build rooms using Dialux evo
-
How to create and import objects
-
How to select luminaires
-
How to aim the spotlights
-
How to create light scenes
-
How to generate and prepare the report
-
How to prepare the lighting layout
Retail Lighting Design Hands-on Tutorials
Light is the sparkling jewelry of architecture. – Nelca Roco
Here we go! This is the best part of this e-book. The hands-on part. The how to’s. The actual designing. Hands-on is the best way to learn to be a lighting designer. Theory and standards will only guide you on what to achieve, but hands-on training will teach you how to achieve it. Enough for the reading. This is now the time to use what we have learned on the previous chapters. We will now proceed to the actual designing and testing the luminaires we selected previously. Actual designing is the most difficult, but exciting part for me.
This chapter will test both your ability to select the right luminaire and your skills using the lighting software. Your imagination and creativity will work with your skills in computer simultaneously.
There are different tutorials you can find in this e-book, every topic has separate videos to watch. To get all the videos, check this link: www.nrocolightingdesign.com/RetailLightingDesign/Tutorials.
What you will learn from these videos:
-
How to clean and understand the CAD file
-
How to build rooms using Dialux evo
-
How to create and import objects
-
How to select luminaires
-
How to aim the spotlights
-
How to create light scenes
-
How to generate and prepare the report
-
How to prepare the lighting layout
Each tutorials takes 30 to 45 minutes. Sample files and presentation slides are included in download section.
These tutorials are free. If you have comments or suggestions, just leave it in the box allotted so we can improve it.
Let’s go and practice it!
Enjoy learning!
1. How to clean and understand the CAD file
Understanding what is inside the CAD file is one of the most important aspects of designing retail lighting. This is where all the information comes in: The ceiling height, furniture layout, height of the shelves, cash counter location, and much more.
As a lighting designer, you must learn how to read the CAD drawing. One specific line means something; therefore, it is paramount to understand it. There are lots of video tutorials in Youtube on how to learn the basics of AutoCAD. The important information to look for in the drawing are; the boundary or wall, furniture layout, ceiling design and height, shelves, colors and texture.
The very first step to do before importing the CAD file into Dialux evo is to clean the drawing and put the XYZ axis to zero. Then, the next thing to do is to check the scale.
Using proper scale is the most common mistakes done by lighting designers.
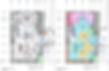
Below is the sample image of AutoCAD file to be imported into Dialuxe evo. You can see the furniture layout, the ceiling layout, and the section drawing of the retail shop. Floor plan has been color-coded to identify the functions of the area.
Furniture must have detailed drawing so we can build it and incorporate it to the calculation.
2. How to build rooms in Dialux evo
Now we are familiar with the AutoCAD drawing, let’s go and explore the Dialux evo software. For this tutorial, we will be using Dialux evo only.
Dialux evo is easy to use. The main objective for a retail shop project is to build up the whole room with furniture and proper texture.
In this tutorial, you will learn how to create the room, insert the ceiling, partitions, doors and windows, and how to create or add textures. Aside from these, you will also learn how to create ceiling channels and slots on the walls.
I am sure that you will love this tutorial because it is so fun to do. I will guide you step by step on how to do it. So, prepare yourselves and let’s start exploring the wonders of Dialux evo software.
I hope you enjoy it!
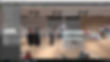
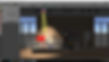
Below is the sample image screen shot in Dialux evo. It shows the window tabs of Dialux evo, the rendered image with furniture and luminaire inside, and the color and texture used in the design.
3. How to create and import objects
So, we’re done with the room build-up. I’m sure you’re excited now to put the furniture and fixtures inside the store. Unlike other projects, retail projects require objects to see the effect of lights. At this point, we don’t so much need uniformity, instead the overall throw of light onto the surface is the main concern, and it can be seen by looking at the pseudo color.
In this tutorial, we will teach you how to import objects from other sources and to create our own 3D files.
There are many options on how to have 3D objects in Dialux evo. One is by creating them inside Dialux evo, the other is by importing them as 3ds files from other software like Sketchup or 3Dmax.
There are free 3ds files available on the internet, like www.3darchive.net and 3dWarehouse. The problem with these is most of them are big files, and once you inserted them to Dialux evo, it will slow down and sometimes crash due to its huge size.
Make sure that you select 3d objects which are less than 1mb. Otherwise, your calculation and rendering time will take longer than usual. Your evo file will also become heavy which will make it difficult to open and save.
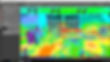
Below is sample image showing pseudo colour or false-color.
4. How to select luminaires
Now, your retail shop is looking good! It’s time to light it up! Are you excited now?
This time we will select the luminaire, the right luminaire or the specified luminaire. If you are working in a lighting company, then it is easy for you to select your fittings. If not, then I will teach you how to get the IES or ULD or LDT files from different manufacturers. We will explore the websites of different lighting manufacturer and we will see how easy or difficult it is to choose and to extract the IES files in their website. Some website has an option for drag and drop, while other companies still need to download the IES or ULD file first before you can use it.
In this tutorial, you will learn how to insert the luminaire, select the luminaire and arrange the luminaires. It is not always spotlights and track lights that are the best solution in retail lighting, there are other ways to highlight the merchandise. I will guide you from selection to installation. Hahaha! Installation to Dialux evo.
So, let’s go and select our luminaires!
Below are sample images showing the sketch of typical luminaire used in retail application; track lights and adjustable downlights.
5. How to aim spotlights
We are almost there! This time, we need to aim the spotlights properly. This is very important because we must consider the glare. Remember our previous discussion about the glare? Some areas need to be glare free; otherwise the exciting experience of the customers will turn to headache. Not good, baby.
Aiming is also important to installers, although, overtime the aim will change as per the new layout of the shop, but at least on the first installation, the spotlights will aim properly and precisely.
There are rules about aiming the spotlights. Some luminaires must not exceed 25 degree angle. While, some may tilt more than 25 degrees, but with restrictions.
In this tutorial, you will learn how to use the aiming option of Dialux evo. This option is one of the amazing features of Dialux evo! I’m sure you will like it too. You will also learn how to arrange the luminaires so they don’t clutter the ceiling. Let’s go and do it now!
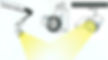
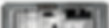
Below is the sample image screen shot from Dialux evo showing the lighted spotlight aimed at the merchandize. It also shows the cool photometric diagram of the spotlight and tilting option of this luminaire.
6. How to create light scenes
Light scene is one of the exciting parts of lighting design in retail shops. Of course, we will need lighting control to do this. Light scenes can be used in a dynamic lighting style. If the retail shop prefers to have color changing lighting, or different lighting effects on some occasions, then this light scene is a must for them.
In this tutorial, you will learn how to create scenes in your lighting design. This is another powerful tool of Dialux evo. You may also do the calculation for daylight. We will include this in the tutorial.
The light scene is also good for identifying the luminaires by group or by section. For example, if you want to turn on all the perimeter lights, or only the downlights, you can do this in this light scene option in Dialux evo.
So, let’s go now and start creating light scenes!
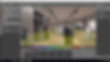
Below is the sample image screen shot in Dialux evo showing the light scene bar below the screen, the calculation result on the right side, and the calculation surface in light yellow color with isolines
7. How to generate and prepare report
In practice, there are three important pages that our clients always want to see. These are the lighting layout, the pseudo-color and the render image. The calculation summary result is sometimes needed, but that is if they want to see the total power load consumption.
The lighting design calculation report requirement varies from to client. Some clients ask for these three pages, while others ask for the full report including raytrace images and value charts.
Dialux evo has the power to save views from different viewports and these views can be turned into nice pictures in the report. I love creating lots of views; it is like you are taking pictures in your design!
In this tutorial, you will learn how to generate a calculation report based on the default of Dialux evo, and how to prepare a customized retail lighting design calculation report. So, let’s go and let’s get started!
Below are some images extracted form Dialux evo showing the lighting layout, rendered image, and pseudo-colour. These three are the usual images included in the report.
8. How to prepare lighting layout
Then we’re at the final! We are about to finish our project. I’m sure you are now confident to show and submit your design. But wait! Let’s prepare the lighting layout in AutoCAD. It is very important for your client to see the exact location of your luminaires. This is also one of the important documents required to complete a working drawing, especially in the electrical part of the documentation.
In this tutorial, you will learn how to export the lighting layout from Dialux, create a better presentation in Autocad, label the luminaires, create a legend, provide dimension, and show the aiming orientation of the luminaires.
As an addition, you will also learn how to create a Title Block and PDF report. You will also learn how to count the luminaires in AutoCAD without counting them one by one – this is so important if you are working in a big retail shop like a supermarket or department store. This is the best secret and I know you will love it! So, let’s go and check it out!
Below is the sample image of lighting layout taken from the CAD file showing the floor plan, luminaire legend, and Zumtobel title block.